
Web 2.0 Directory — Documentation
Version 3.x.xWeb 2.0 Directory turns any WordPress site into a full-featured, map-driven directory or classifieds platform — multiple directories, custom listing forms, categories & locations, Google / Mapbox / MapLibre maps, front-end submission, paid membership plans, ratings & reviews, and CSV import/export. This guide covers installation, every shortcode and its parameters, the feature set, styling & template overrides, and translation.
Installation & Getting Started
This guide walks you from a blank WordPress install to a working directory with its first published listing. Follow the numbered steps in order; the built‑in setup wizard mirrors the same sequence.
1. System requirements
Before installing, confirm your site meets these minimums:
| Requirement | Minimum | Notes |
|---|---|---|
| WordPress | 6.0 or higher | Tested up to WordPress 6.7. Activation is blocked on very old versions. |
| PHP | 7.4 or higher | 8.0+ recommended for best performance. |
| MySQL / MariaDB | Any version supported by your WordPress release | The plugin creates its own helper tables on activation. |
| WooCommerce | Optional | Only required if you want to charge for listings (paid plans, renewals, upgrades). Maps and free listings work without it. |
| Map provider account | Optional but recommended | A Google Maps, Mapbox, or MapTiler key/token is needed to render maps and to geocode addresses. |
2. Install and activate the plugin
You can install from a ZIP file or by copying the plugin folder.
Option A — Upload the ZIP (recommended)
- In WordPress admin, go to Plugins → Add New → Upload Plugin.
- Click Choose File, select the
w2dcZIP you downloaded, and click Install Now. - When the upload finishes, click Activate Plugin.
Option B — Manual (FTP/SFTP)
- Unzip the download and upload the
w2dcfolder to/wp-content/plugins/on your server. - In WordPress admin, go to Plugins, find Web 2.0 Directory (W2DC), and click Activate.
Tip: Only one version may run at a time. If you also have the free version active, the paid Web 2.0 Directory takes precedence and the free copy is automatically deactivated with a notice — this is expected.
After activation, the plugin adds several top‑level menus to the WordPress admin sidebar:
| Menu | What it is |
|---|---|
| Directory listings | Where you add and manage individual directory listings. |
| Directories | Your directory containers (each has its own categories, locations, tags and page layout). |
| Maps | Optional standalone maps you can embed anywhere. |
| Directory Admin | Opens the plugin Settings, plus the Form Builder, CSV import/export, and Form Builders screens. |

3. Enter your purchase code to enable updates
Your purchase code unlocks one‑click updates from within WordPress. Enter it once, right after activation.
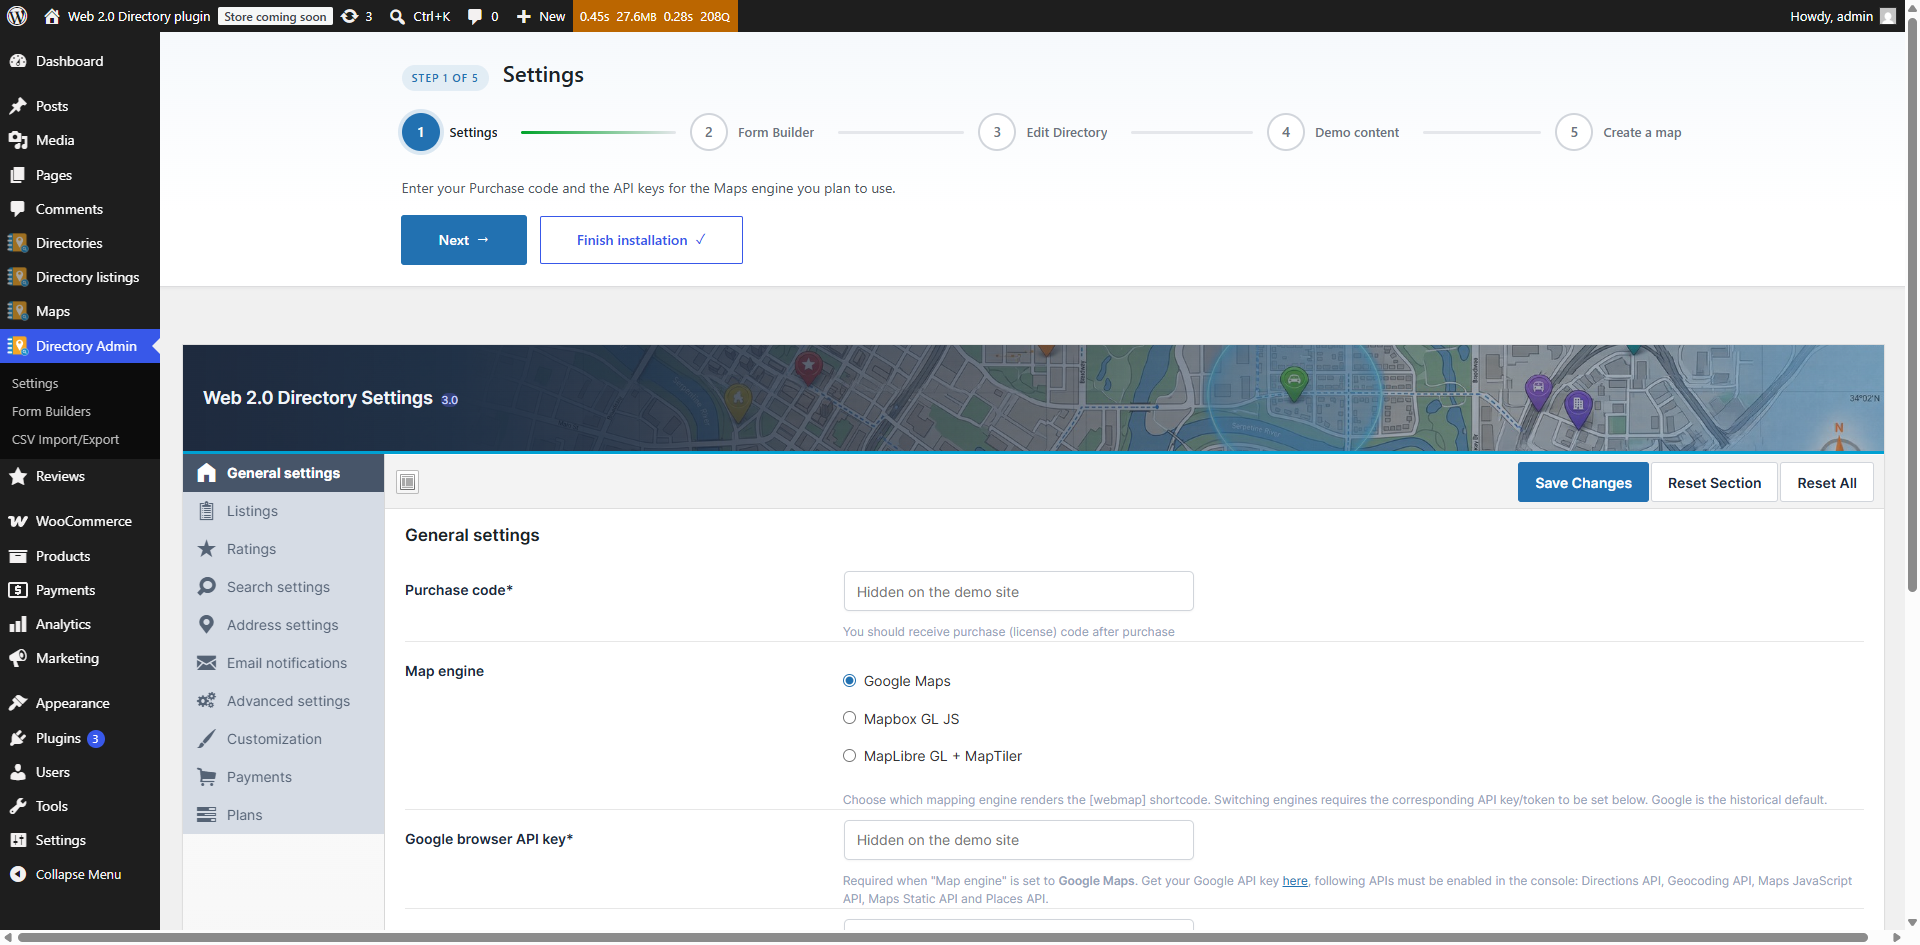
- Go to Directory Admin → Settings (the page is titled Web 2.0 Directory Settings).
- On the General settings tab, the first field is Purchase code*.
- Paste the purchase (license) code from your purchase confirmation email.
- Scroll to the bottom of the panel and click Save Changes.
When you save, the plugin contacts the license server (salephpscripts.com) and verifies the code for your site URL:
- On success you'll see a green confirmation notice, and a small support‑status indicator next to the field shows how long updates and support are covered.
- If verification fails, a red notice appears and other settings on the page will not be saved until a valid code is entered — so verify the code first, then configure the rest.
Once the code is verified, new versions appear automatically under Dashboard → Updates and on the Plugins screen, just like any WordPress.org plugin. Only your site URL and purchase code are sent to the license server, and only during update checks.
What if I skip this? The plugin remains fully functional without a purchase code, but it will not receive automatic updates. You can add the code at any later time.
While you're on the General settings tab, also set your Map engine (Google Maps, Mapbox GL JS, or MapLibre + MapTiler) and paste the matching API key/token — maps and address geocoding require it.
4. Run the setup wizard
The first time you open the WordPress admin after activating, Web 2.0 Directory redirects you into a guided setup wizard. A progress bar appears at the top of the screen with Back / Next buttons; the final step's button reads Finish setup. You can leave at any point using Finish installation, and re‑running the wizard is as simple as deactivating and reactivating the plugin.
The wizard walks through these steps:
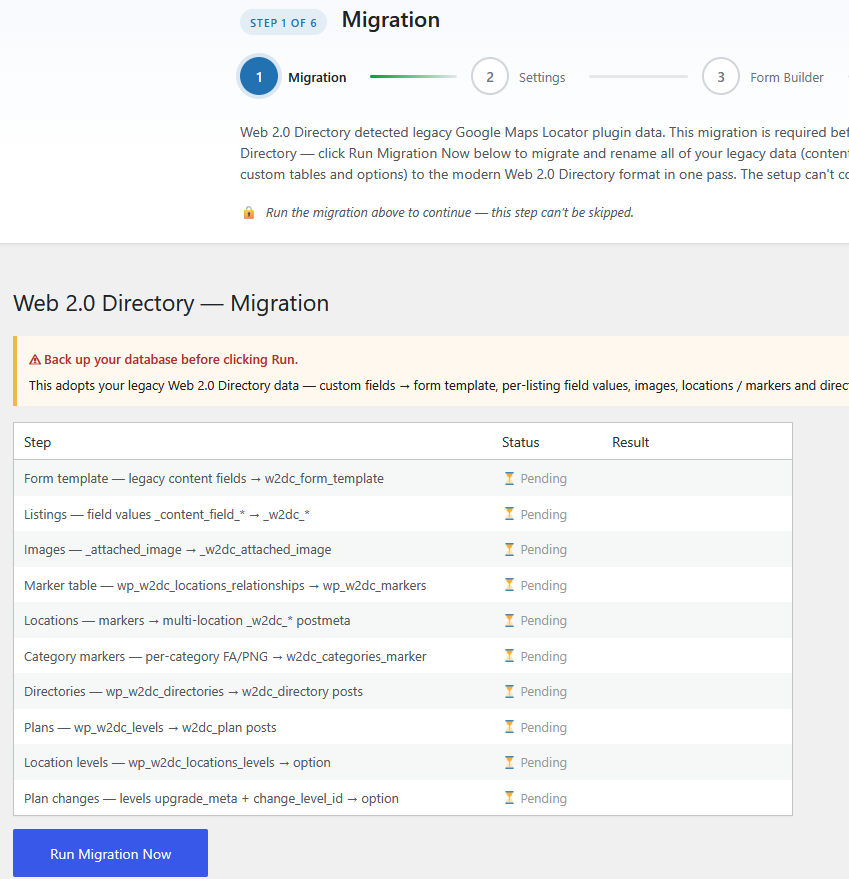
- Migration (only if needed) — Appears only when the wizard detects data from a previous Web 2.0 Directory installation. This step is mandatory when shown: you must run the migration to completion before the wizard will continue. Fresh installs skip it entirely. Back up your database and files before you run the migration — it writes to your existing directory data and cannot be undone.
- Settings — "Enter your Purchase code and the API keys for the Maps engine you plan to use." Opens the settings page from Step 3 above.
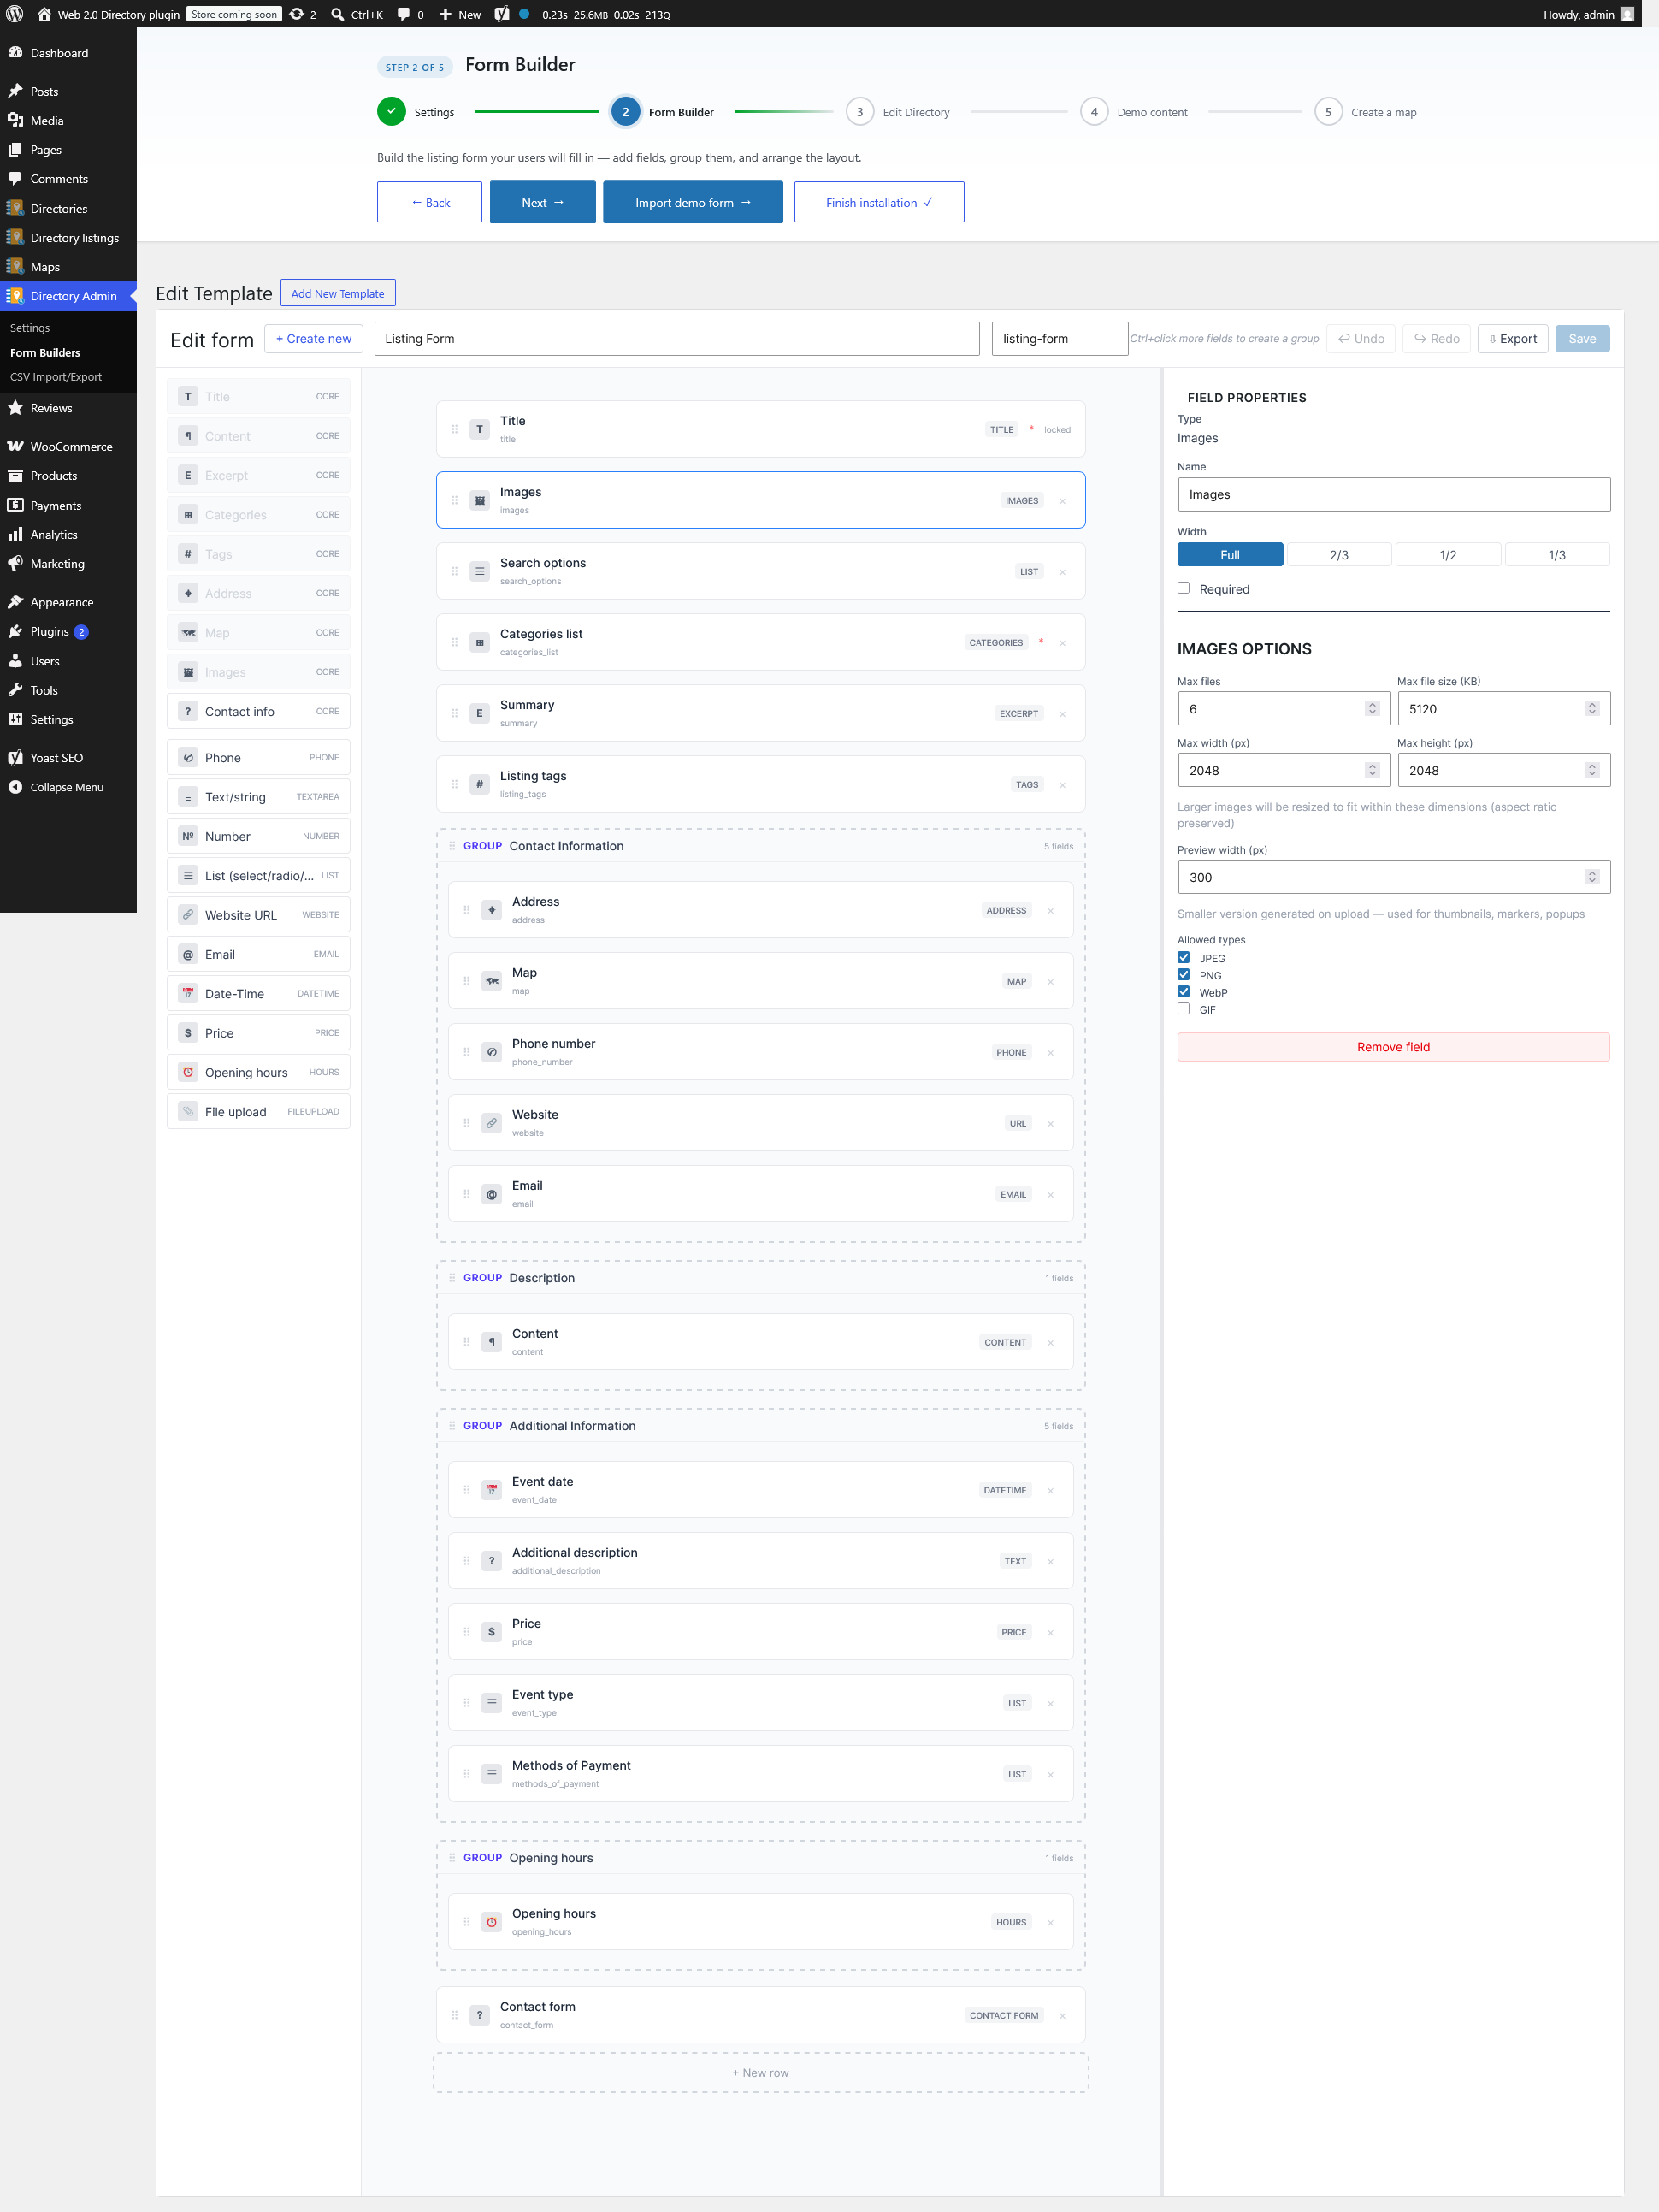
- Form Builder — "Build the listing form your users will submit — add fields, group them, and arrange the layout." Design the fields (text, select, checkbox, price, opening hours, date, website, email, and more) that make up a listing. A default listing form is created for you if none exists, and an Import demo form shortcut can load a ready‑made example. (see Submit Form and Custom Fields (Form Builder))
- Edit Directory — "Arrange your directory's pages — drag and drop the elements visitors browse (search, listings grid, categories, map)." Opens the visual page builder for your default directory (see Step 5).
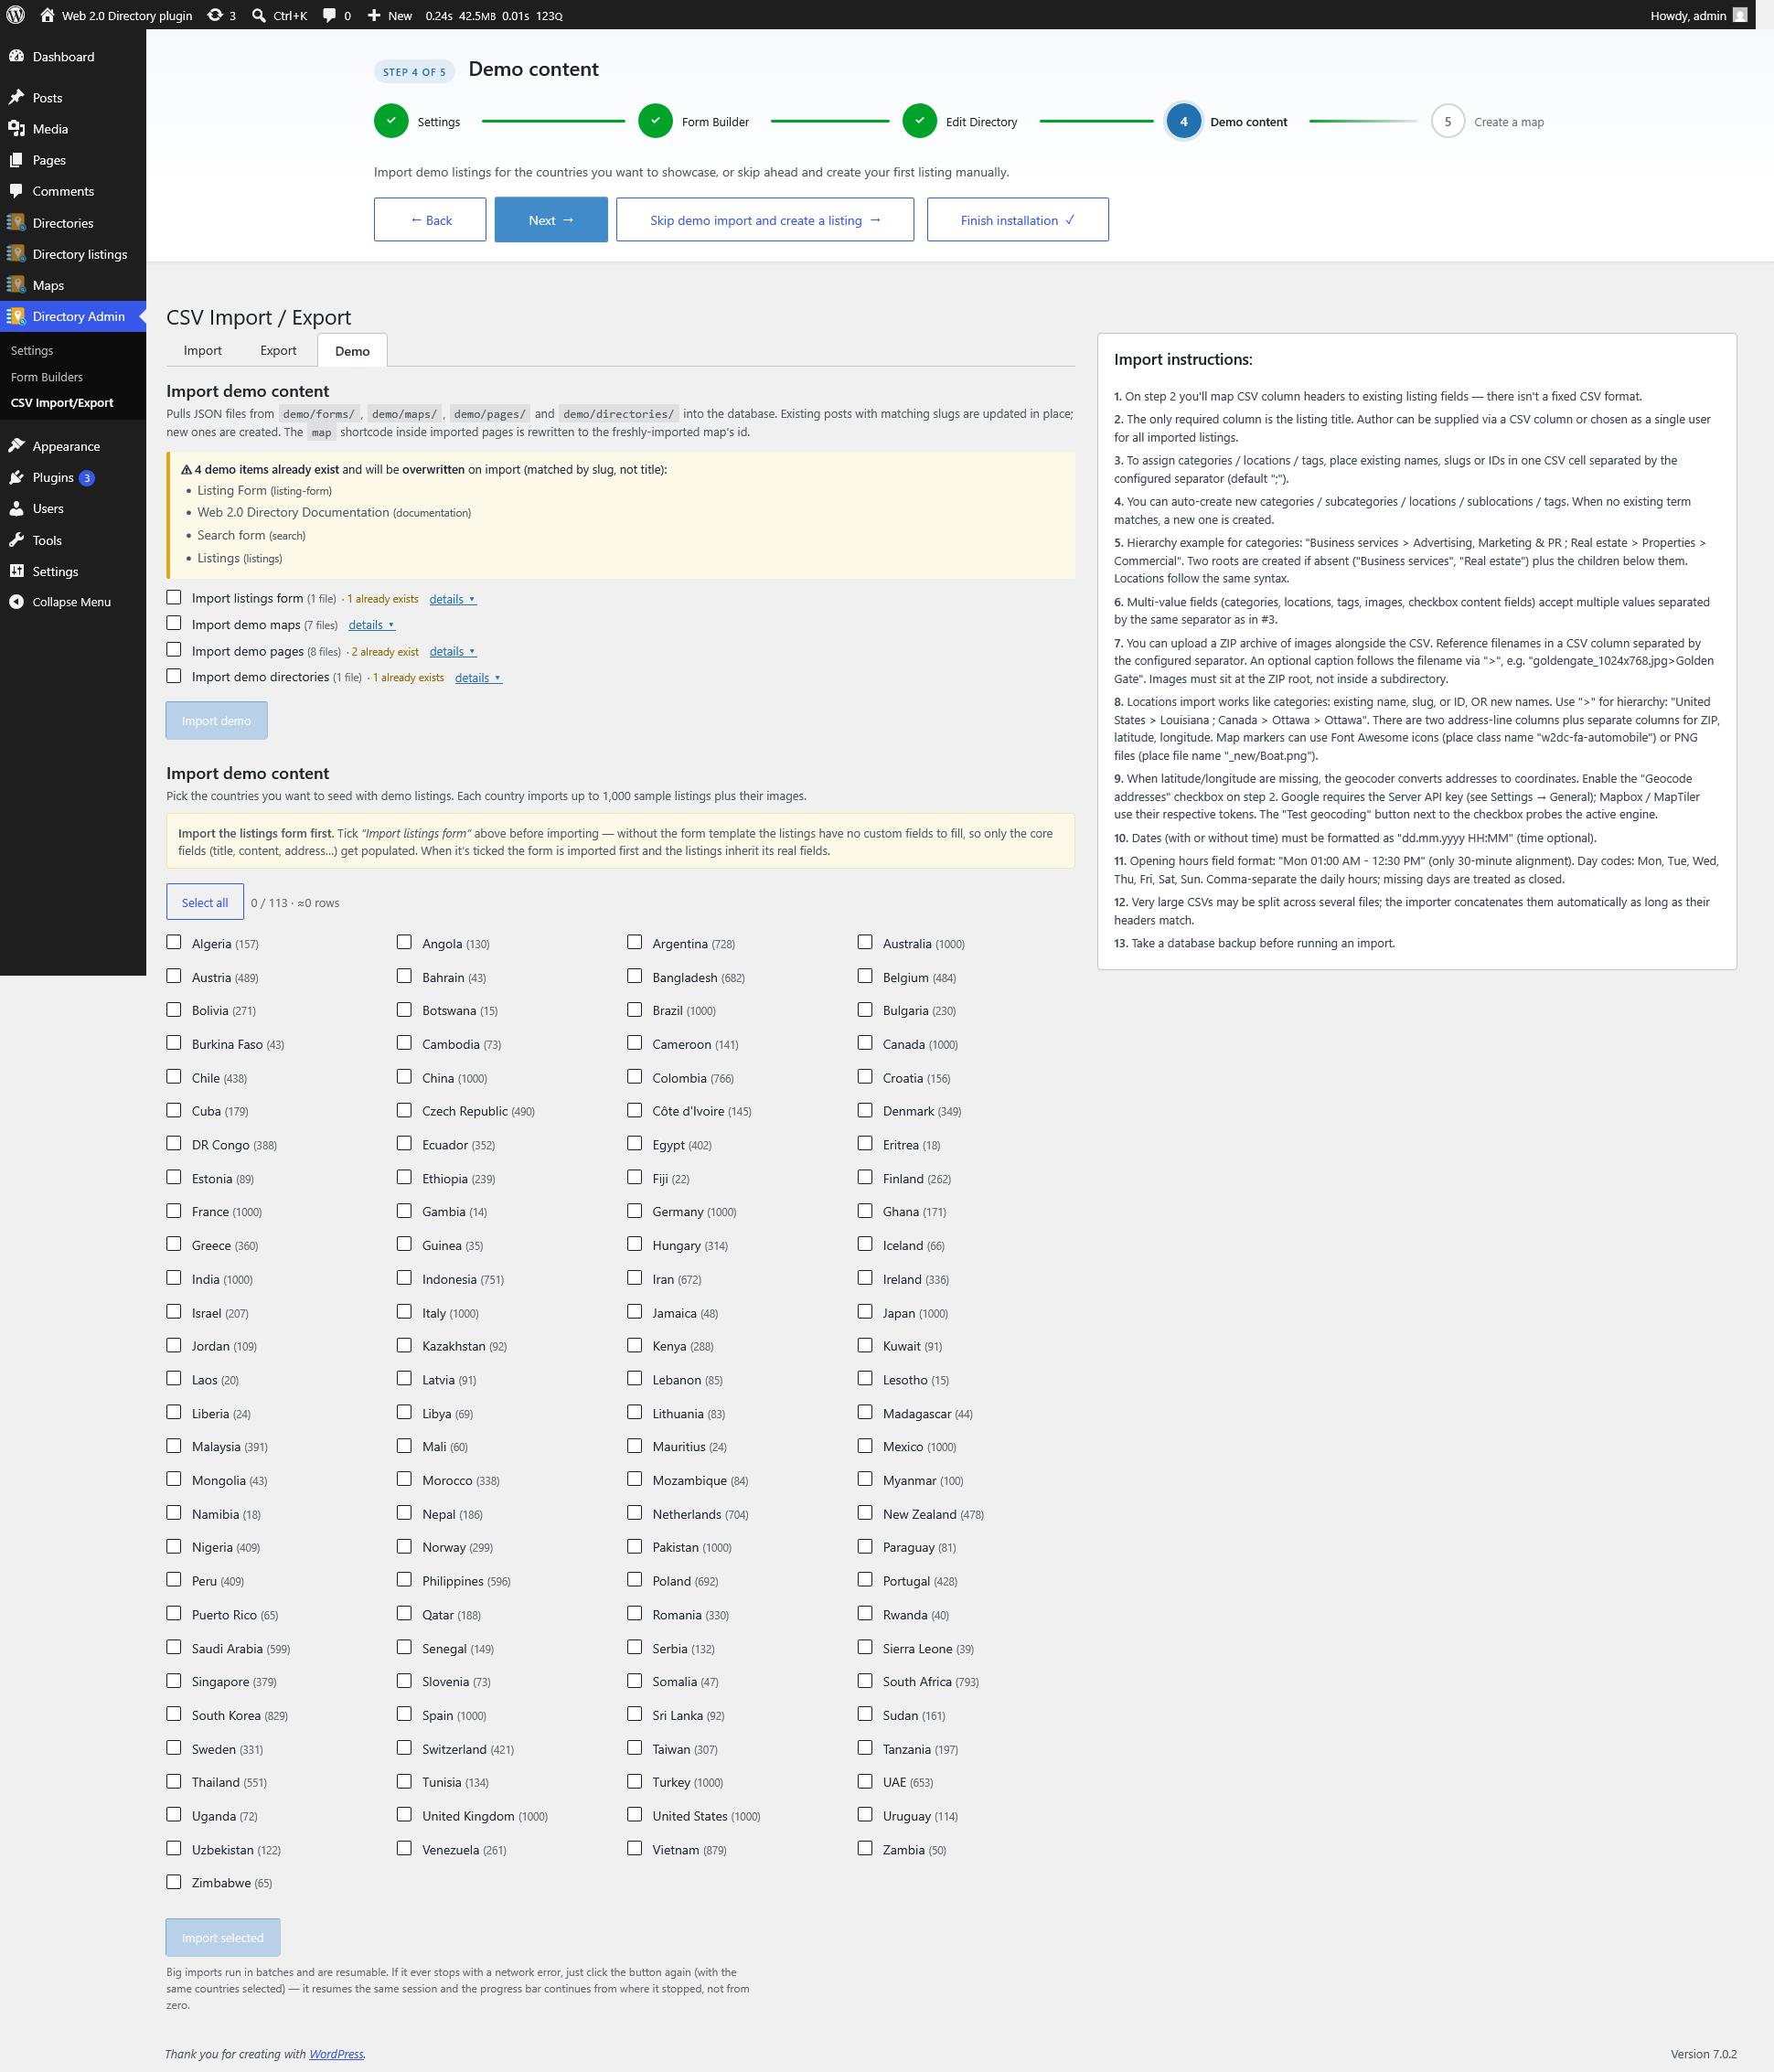
- Demo content — "Import demo listings for the countries you want to showcase, or skip ahead and create your first listing manually." Adds a Demo tab to the CSV import screen (see Step 6).
- Create a map — "Build your first map. After saving, you can create a page with the map shortcode in one click." Optional: build a standalone interactive map. (Your directory already gets its own map through the directory page builder, so this step is only needed if you also want a map embedded elsewhere.)
After you click Finish setup, the wizard drops the setup parameters and lands you on the Maps list, ready for normal use.



5. Create the directory page with the main shortcode
A directory is displayed on a normal WordPress page using the container shortcode:
[webdirectory id=N]where N is the ID (or slug) of your directory. You do not have to build this by hand — the plugin can create the page for you:
- Go to Directories and open your directory (a default directory named Listings is created automatically on a fresh install).
- In the toolbar at the top of the Edit Directory screen, click Create page with this directory.
- The plugin creates and publishes a new page whose content is
[webdirectory id=N], then opens it.
If a page already hosts this directory, the button instead reads Open directory page and simply takes you there (it never creates a duplicate).
Prefer to place the directory yourself? Create or edit any page, add the shortcode [webdirectory id=N] to the content, and publish. Related front‑end shortcodes are also available:
| Shortcode | Purpose |
|---|---|
[webdirectory id=N] | The directory itself — search, listings grid, categories, locations and map. |
[webdirectory-submit directory=N] | Front‑end form for visitors/members to submit a listing. |
[webdirectory-dashboard] | Member dashboard for managing their own listings. |
![The Create page with this directory button in the Edit Directory toolbar, which publishes a page containing the [webdirectory id=N] shortcode.](https://directory.salephpscripts.com/wp-content/themes/directory-theme/assets/img/docs/09-install.png)
6. (Optional) Import demo content
To populate your directory quickly with realistic sample data:
- Open the Demo content wizard step, or go directly to Directory Admin → CSV Import/Export and select the Demo tab.
- Pick one or more countries from the list — each shows how many sample listings it contains.
- Start the import. Listings are created together with their images, and progress is shown inline.
This is the fastest way to see a fully populated directory before adding your own listings. You can delete the demo listings later from Directory listings.
7. Quick walkthrough: your first listing
With the directory and its page in place, add a listing manually:
- Go to Directory listings → Create new listing.
- Enter a title for the listing (for example, the business name).
- Fill in the custom fields you defined in the Form Builder — address, phone, website, opening hours, category selections, and so on. Entering an address geocodes it to a map marker (requires a configured map engine and API key).
- In the Directory box, choose which directory (or directories) the listing belongs to; on a single‑directory site it is assigned automatically.
- If you use paid plans, select the listing's plan.
- Click Publish.
- Visit your directory page (from Step 5). Your new listing now appears in the listings grid and on the map, and is searchable by category, location, and custom fields.
That's it — you now have a live directory with its first listing. From here you can define membership plans under Directory Admin -> Settings -> Plans, enable front‑end submission with [webdirectory-submit], and connect WooCommerce to charge for paid listings.
Web 2.0 Directory registers a family of shortcodes you can place in any page, post, or widget. They fall into three groups:
- Directory & page shortcodes — the top-level building blocks you add to a page to create a directory, a submission page, a member dashboard, or a single-listing template.
- Element shortcodes (
[webdirectory-…]) — the individual pieces of a directory page: search, map, listings grid, category/location grids, breadcrumbs, buttons, and so on. In normal use these are placed for you automatically by the visual page builder on the Edit Directory screen, so you rarely type them by hand. They are documented here because they also work standalone — for example inside a custom home layout or a single-listing template page. - Utility shortcodes — extra front-end helpers such as the map-engine switcher.
Notes on syntax
- Boolean attributes accept
1/0(you may also writetrue/false). For example,show_sort="0"turns the sort control off. - Any attribute you omit falls back to the default shown in the tables below.
- Element shortcodes that live inside a directory read their settings from the directory's saved configuration when you use the builder; the attributes below let you override those settings when you place the shortcode by hand.
Directory & page shortcodes
[webdirectory]
The main container. Renders a complete directory — its home view plus (via clean URLs) its category, location, favourites, and single-listing sub-views. Place it on a normal WordPress page.
| Attribute | Default | Description |
|---|---|---|
id | 0 | Which directory to display. Accepts a numeric directory ID, or the directory's slug or title. Leave empty (or 0) to show the site's default directory. |
custom_home | 0 | Set to 1 to build the home page by hand instead of using the saved layout. In this mode [webdirectory] renders only the listings block, and you position the map, search, category, and location blocks yourself using their element shortcodes (each with custom_home="1"). On every other view (category, location, listing, favourites) the directory's saved layout is used regardless of this setting. custom-home is accepted as an alias. |
[webdirectory id="12"]![A published directory page (a page containing [webdirectory]) as visitors see it — page title, search form, category grid, map, and listings grid together.](https://directory.salephpscripts.com/wp-content/themes/directory-theme/assets/img/docs/10-shortcodes.png)
[webdirectory-submit]
Renders the "submit a listing" page. Anonymous visitors see a sign-in / registration step first (unless anonymous submissions are enabled in the settings); logged-in users get the submission form, guided by a plan-selection wizard when the directory offers paid plans.
The shortcode accepts one attribute:
| Attribute | Default | Description |
|---|---|---|
directory | site default | Numeric ID of the directory a new listing is submitted to — e.g. [webdirectory-submit directory="12"]. Pins a dedicated submit page to one directory (its plans + assignment); id is accepted as an alias. Omit it and the site's default directory is used. A directory's Submit button can also target it per-visit with a ?directory=N URL parameter (which overrides the attribute); the plan wizard then appends its own ?w2dc_plan=… step. |
[webdirectory-submit]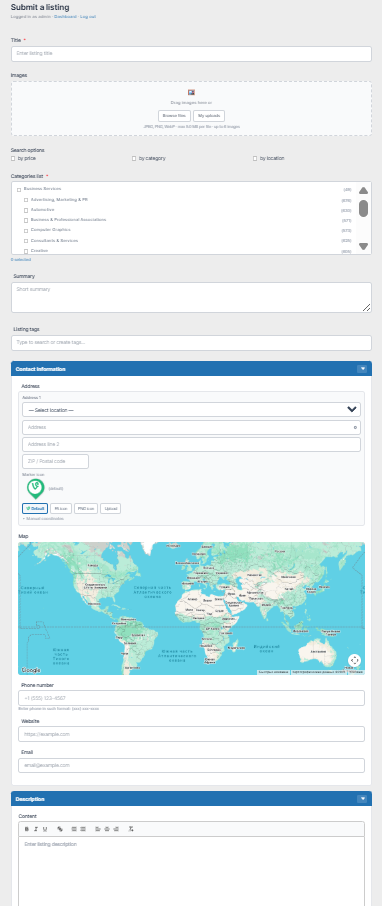
[webdirectory-dashboard]
Renders the front-end member dashboard: sign-in, registration, and password recovery for logged-out visitors; "My Listings", profile, and per-listing edit views for logged-in users. Takes no attributes — the current view is chosen from the query string (?tab=profile, ?view=listing&listing_id=…, ?w2dc_action=register, etc.).
[webdirectory-dashboard]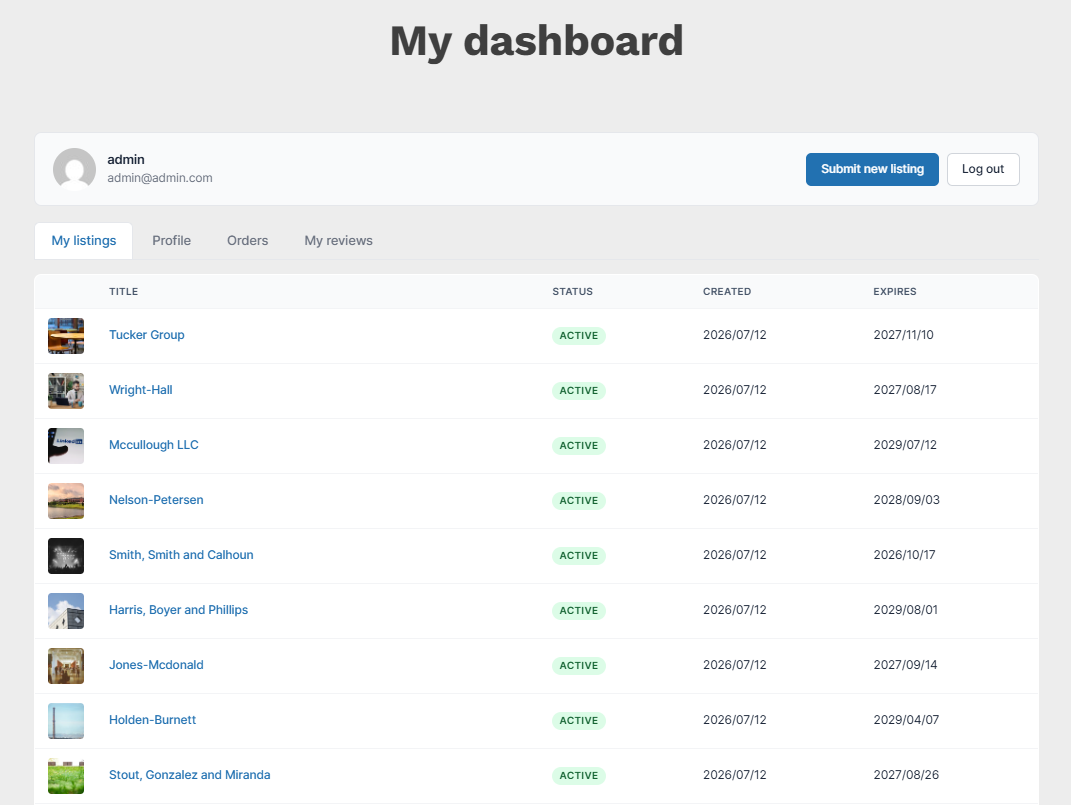
[webdirectory-listing-page]
Designates the page it is placed on as the single-listing template for one or more directories, and renders the current listing's layout in its place. Listing URLs stay under the directory container; this only controls how the single-listing view is laid out, so any theme can style it and you can edit the template like a normal page.
| Attribute | Default | Description |
|---|---|---|
directory | 0 | Comma-separated list of the directories this page is the listing template for. Each token accepts a numeric ID, slug, or title. Leave empty (or 0) for the default directory. |
[webdirectory-listing-page directory="12,15"]Directory element shortcodes (browse pages)
[webdirectory-search]
Renders the directory's front-end search form — the form visitors use to filter this directory's listings. Submitting it updates both the listings grid and the map on the page, and the request is automatically scoped to the current directory (results never leak in from other directories). Out of the box the form offers a keyword box, an address + radius search, and category / location / tag filters. If you design a custom search form for the directory in the search-form builder (on the Edit Directory screen — for example adding filters for your own custom listing fields), that form is rendered here instead.
| Attribute | Default | Description |
|---|---|---|
custom_home | 0 | Set to 1 when placing this block in a hand-built home layout (see [webdirectory custom_home]). |
[webdirectory-search]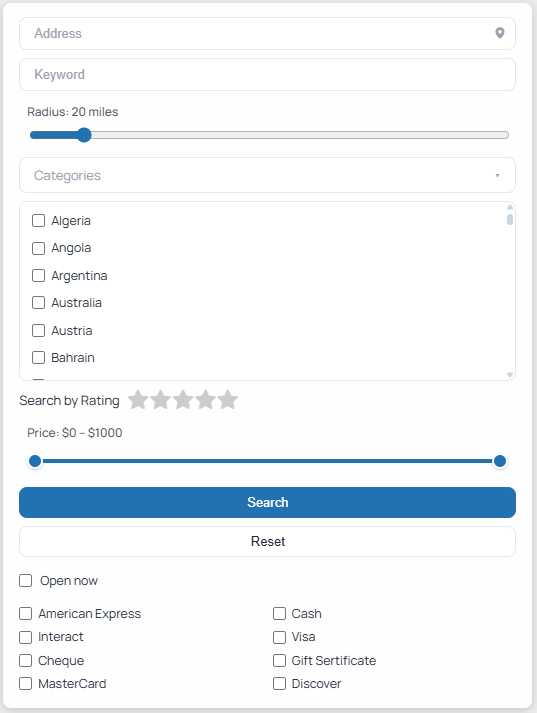
[webdirectory-map]
Shows a map inside the directory, scoped to the directory's listings.
| Attribute | Default | Description |
|---|---|---|
map_id | 0 | ID of the map to display. 0 renders nothing on the front end (admins see a "choose a map" prompt in the editor). |
only_current_listings | true | When on, the map shows only the listings currently in the results/view; set to 0 to always plot every mapped listing in the directory. |
custom_home | 0 | Set to 1 when placing this block in a hand-built home layout. |
[webdirectory-map map_id="8"][webdirectory-listings]
The directory's listings grid or list, with optional view switch and sort controls.
| Attribute | Default | Description |
|---|---|---|
perpage | 20 | Listings per page. |
view | grid | Initial layout: grid or list. |
columns | 2 | Grid columns on desktop (1–4). |
columns_tablet | 2 | Grid columns at tablet width (1–4). |
columns_mobile | 2 | Grid columns at mobile width (1–4). |
image_ratio | 4 / 3 | Card image aspect ratio. One of 4 / 3, 3 / 2, 16 / 9, 1 / 1, 4 / 5. |
allow_view_switch | true | Show the grid/list toggle to visitors. |
show_sort | true | Show the sort dropdown. |
order_by | post_date | Default sort field. |
order | DESC | Default sort direction: ASC or DESC. |
only_map_listings | false | Show only the listings currently plotted on the map. |
fields | empty | Optional curated list of card fields to render (otherwise the default card fields are shown). |
custom_home | 0 | Set to 1 when placing this block in a hand-built home layout. |
[webdirectory-listings perpage="12" view="grid" columns="3" show_sort="1"][webdirectory-categories]
A grid of the directory's categories, with listing counts and links into each category's sub-page.
| Attribute | Default | Description |
|---|---|---|
depth | 1 | How many levels of the hierarchy to show (1–2). |
columns | 3 | Columns on desktop (1–6). |
columns_tablet | 2 | Columns at tablet width (1–6). |
columns_mobile | 1 | Columns at mobile width (1–6). |
terms | empty | Restrict the grid to specific category term IDs (comma-separated). |
show_count | true | Show the number of listings in each category. |
custom_home | 0 | Set to 1 only when hand-building a custom Home layout that places this element outside the automatic directory home. |
[webdirectory-categories depth="1" columns="4"][webdirectory-locations]
A grid of the directory's locations. Same attributes and defaults as [webdirectory-categories].
| Attribute | Default | Description |
|---|---|---|
depth | 1 | How many levels of the hierarchy to show (1–2). |
columns | 3 | Columns on desktop (1–6). |
columns_tablet | 2 | Columns at tablet width (1–6). |
columns_mobile | 1 | Columns at mobile width (1–6). |
terms | empty | Restrict the grid to specific location term IDs (comma-separated). |
show_count | true | Show the number of listings in each location. |
custom_home | 0 | Set to 1 only when hand-building a custom Home layout that places this element outside the automatic directory home. |
[webdirectory-locations columns="3" show_count="1"][webdirectory-page-title]
Renders the heading for the current view (directory name on home, term name on a category/location page, or the listing title on a single-listing page).
| Attribute | Default | Description |
|---|---|---|
tag | h1 | HTML heading tag: h1 or h2. |
font_size | 40 | Font size in pixels (16–60). |
align | left | Text alignment: left, center, or right. |
[webdirectory-page-title tag="h1" font_size="36" align="center"][webdirectory-breadcrumbs]
Renders the breadcrumb trail for the current view (nothing on the home view). Takes no attributes.
[webdirectory-breadcrumbs][webdirectory-term-description]
On a category or location sub-page, outputs that term's description. Renders nothing elsewhere or when the term has no description. Takes no attributes.
[webdirectory-term-description][webdirectory-buttons]
Renders a row of action buttons appropriate to the current view.
| Attribute | Default | Description |
|---|---|---|
buttons | empty | Comma-separated list of buttons to show. On browse pages: submit (link to the submission page) and favourites (link to the favourites view). On a single-listing page: edit (shown only to users who can edit the listing) and bookmark (add/remove the listing from the visitor's saved favourites). |
[webdirectory-buttons buttons="submit,favourites"][webdirectory-slider]
A horizontal, scroll-snapping strip of the directory's most recent listings that have an image (each listing's logo, or its first attached image). Listings with no image are skipped, and the element renders nothing if none of the recent listings have one. It needs no slider library — the sliding is pure CSS scroll-snap, while the prev/next arrows and optional autoplay are added by a small script. On a directory page it automatically shows only that directory's listings, and it is also available as a drag-and-drop block in the directory page builder (where these attributes appear as its settings).
| Attribute | Default | Description |
|---|---|---|
slides | 5 | Number of cards to show (1–20). The query over-fetches and drops imageless listings, so you reliably get up to this many. |
width | 0 | Maximum width of the whole strip, in pixels. 0 means full width (100%) of its container. |
height | 400 | Slide height in pixels (80–1200). With image_ratio this sets each slide's width. On narrow / mobile screens the height is capped at 280px. |
image_ratio | 16 / 9 | Per-slide aspect ratio. One of 4 / 3, 3 / 2, 16 / 9, 1 / 1 or 4 / 5 (any other value falls back to 16 / 9). |
image_fit | cover | How each image fills its slide: cover fills and crops; contain fits the whole logo inside, letterboxed if needed. |
captions | true | Overlay the listing title on each slide. Set to false to hide the visible caption (the title still rides the link as a tooltip). |
order_by | post_date | Sort field: post_date (newest first), title (alphabetical) or random. |
order | DESC | Sort direction, DESC or ASC (ignored when order_by="random"). |
categories | empty | Restrict to these categories — a comma-separated list of category term IDs (e.g. 4,9). Empty means no category filter. |
locations | empty | Restrict to these locations, same format as categories. When both are set, a listing must match a chosen category and a chosen location. |
autoplay | false | Auto-advance the strip. Autoplay pauses while the pointer is over it and is skipped entirely for visitors who prefer reduced motion. |
autoplay_delay | 4000 | Milliseconds between auto-advances (minimum 1500). Only used when autoplay is on. |
[webdirectory-slider slides="8"]
[webdirectory-slider slides="6" image_ratio="1 / 1" image_fit="contain" captions="false" autoplay="true" autoplay_delay="3000" width="960"]
[webdirectory-slider order_by="title" order="ASC" categories="4,9" height="480" image_ratio="3 / 2"]
[webdirectory-plans]
Renders a comparison of the submission plans, each with a call-to-action button pointing at the submission page.
| Attribute | Default | Description |
|---|---|---|
source | directory | Which plans to show: directory (the plans offered by the current directory) or all (every plan). |
columns | 3 | Number of plan columns (1–4). |
cta_label | Get started | Text on each plan's button. |
[webdirectory-plans source="directory" columns="3" cta_label="Choose plan"]Directory element shortcodes (single-listing pages)
These render pieces of an individual listing. On a single-listing view they act on the current listing automatically.
[webdirectory-listing-fields]
Renders the listing's description and its custom fields.
| Attribute | Default | Description |
|---|---|---|
fields | empty | Optional curated, ordered list of fields to render. When empty, the listing description plus all fields are shown. |
[webdirectory-listing-fields][webdirectory-content-field]
Renders a single custom field from the current listing.
| Attribute | Default | Description |
|---|---|---|
field | empty | The field to display. |
show_label | true | Show the field's label alongside its value. |
[webdirectory-content-field field="phone" show_label="1"][webdirectory-content-fields-group]
Renders a whole group of custom fields from the current listing.
| Attribute | Default | Description |
|---|---|---|
group | empty | The field group to display. |
[webdirectory-content-fields-group group="contact-details"][webdirectory-listing-gallery]
Renders the current listing's image gallery.
| Attribute | Default | Description |
|---|---|---|
columns | 3 | Number of thumbnail columns. |
image_size | 0 | Minimum width, in pixels, of each thumbnail cell in the grid; 0 falls back to 150px. Thumbnails themselves are always generated at WordPress's large size. |
[webdirectory-listing-gallery columns="4"][webdirectory-listing-rating]
Renders the listing's rating badge (average score and review count) when ratings are enabled for the site. Renders nothing when there is no rating data.
| Attribute | Default | Description |
|---|---|---|
size | 16 | Rating icon size in pixels (5–60). |
id | 0 | Listing ID to show the rating for. 0 uses the current listing. |
[webdirectory-listing-rating size="20"][webdirectory-listing-comments]
Renders the current listing's comments list and comment form (when comments are open). Takes no attributes.
[webdirectory-listing-comments][webdirectory-listing-contact]
Renders a contact form that sends a message to the listing's owner.
| Attribute | Default | Description |
|---|---|---|
cf7_shortcode | empty | Optional Contact Form 7 shortcode to use instead of the built-in form. Falls back to the site-wide contact form setting when empty. |
logged_in_only | false | Require visitors to be logged in to see the form. |
[webdirectory-listing-contact logged_in_only="0"][webdirectory-listing-report]
Renders a "report this listing" form that emails the site administrator.
| Attribute | Default | Description |
|---|---|---|
recipient_email | site admin email | Address that reports are sent to. Falls back to the site administrator's email when empty or invalid. |
logged_in_only | false | Require visitors to be logged in to submit a report. |
[webdirectory-listing-report logged_in_only="1"][webdirectory-listing-claim]
Renders a "claim this listing" form (shown only on listings whose plan allows claiming, to visitors who are not already the owner and have no pending claim).
| Attribute | Default | Description |
|---|---|---|
cf7_shortcode | empty | Optional Contact Form 7 shortcode to use as the claim form. |
logged_in_only | false | Require visitors to be logged in to submit a claim. |
[webdirectory-listing-claim logged_in_only="1"]Utility shortcodes
[webdirectory-engine-switcher]
Renders a small button group that lets visitors switch the active map engine (Google Maps / Mapbox / MapLibre) by reloading the page. Intended for demo pages; the switch only takes effect when per-visit engine overrides are enabled in wp-config.php (otherwise the buttons render with a short "URL switching disabled" note).
| Attribute | Default | Description |
|---|---|---|
label | Map engine: | Text shown before the buttons. Pass label="" to hide it. |
[webdirectory-engine-switcher label="Choose engine:"]Features
Web 2.0 Directory turns WordPress into a full business directory: one or many searchable directories, membership plans with paid submissions, an interactive map, a drag-and-drop page builder, and front-end submission with a member dashboard. This section tours each capability and tells you exactly where its settings live in wp-admin.
The plugin adds four top-level menus to wp-admin:
- Directories – create and lay out each directory container.
- Directory listings – manage all listings, plus the Directory categories, Directory locations and Directory tags submenus.
- Maps – build and configure interactive maps.
- Directory Admin – Settings, Form Builders and CSV Import/Export.
Multiple Directories
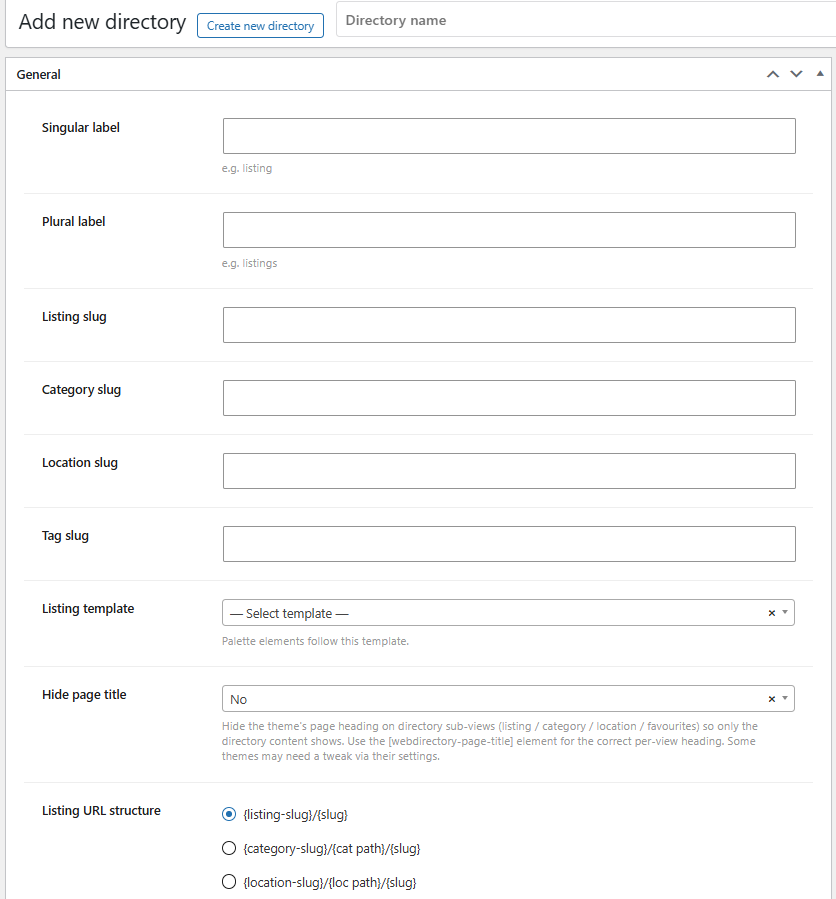
You can run any number of independent directories on one site — for example a "Restaurants" directory and a separate "Real Estate" directory — each with its own listing vocabulary, URL slugs, page layout and pricing plans. Every directory is created under Directories → Add Directory. On the edit screen you set the singular/plural labels (e.g. listing / listings), the URL slugs for listings, categories, locations and tags, the listing template, and whether the theme's page title is hidden on directory sub-views. A default directory named "Listings" is created automatically on a fresh install, so the plugin works out of the box.
To publish a directory, create a normal WordPress page and add the shortcode [webdirectory id=N], where N is the directory's ID. That single page then serves every directory view — the home grid, category and location browse pages, single listings and the visitor's favourites. Use the Make duplicate row action on the Directories list to clone a fully-configured directory (all settings and page layouts) as a starting point for the next one.
Settings: Directories (top-level menu) → Add Directory / edit a directory.
Submit Form and Custom Fields (Form Builder)
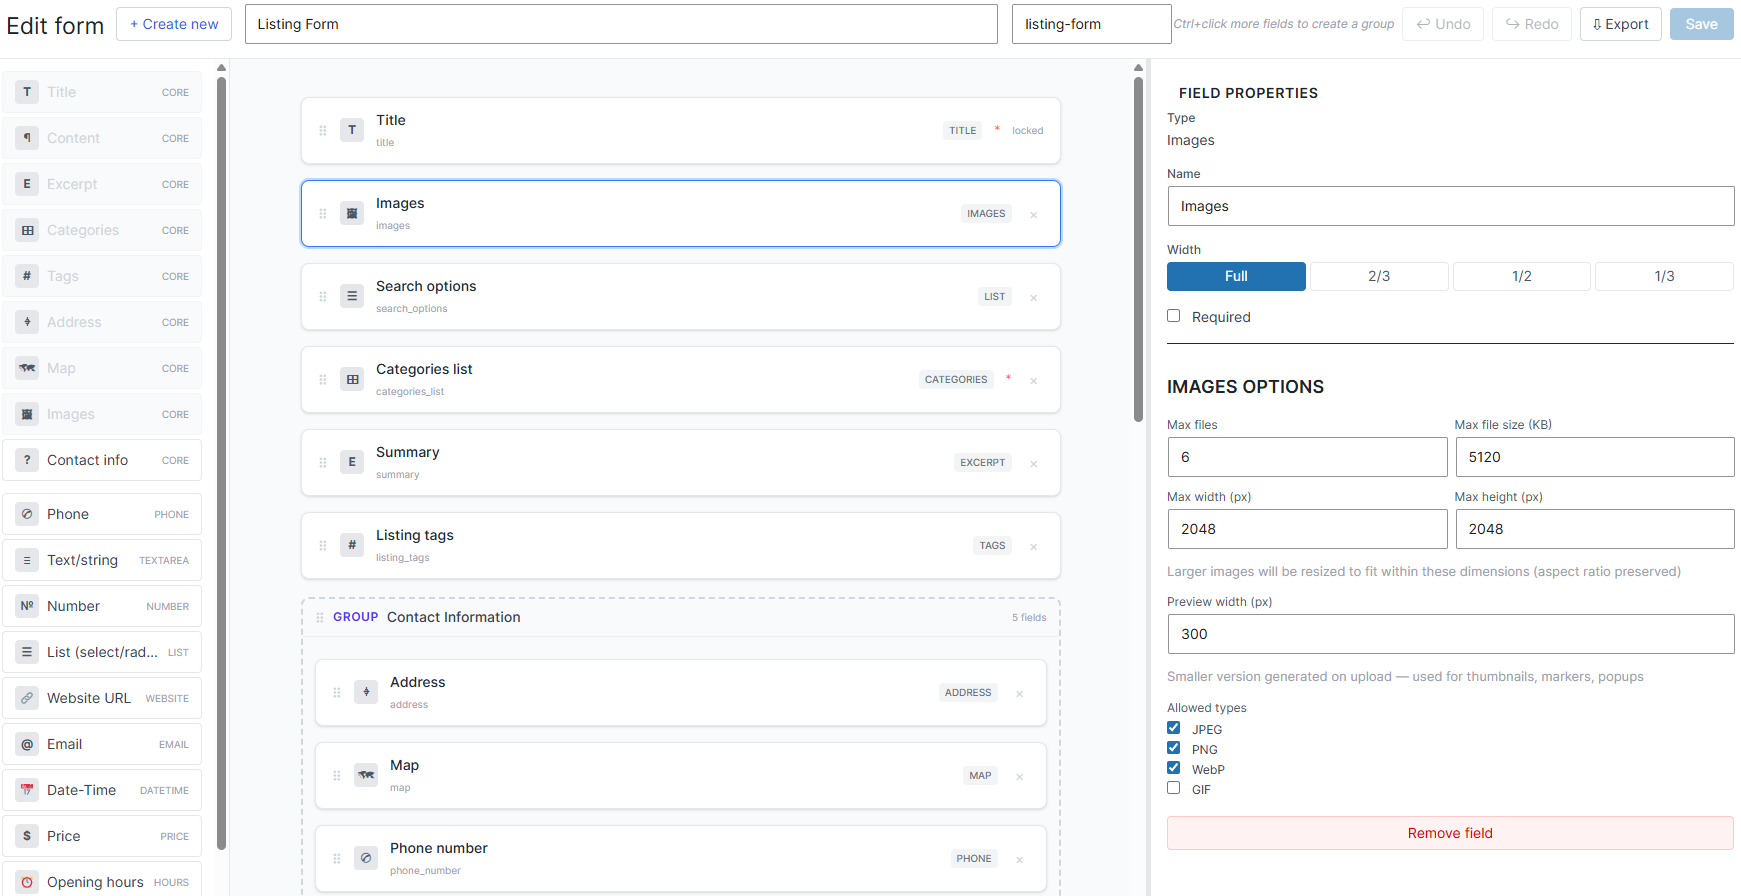
Listings are the core content type — each is an entry with a title, description, address, images and any custom fields you define. Admins manage them under Directory listings; visitors and members create them through the front-end submission form (see Front-end Submission). What a listing form contains is entirely up to you: the Form Builder is a drag-and-drop editor where you compose the listing form from a palette of field types, including single-line and multi-line text, dropdown/checkbox/radio selection lists, price, number, date/time, opening hours, website, email, image upload and address fields. Fields are arranged into rows and columns, so you control the exact layout of the form.
Each form you build is saved as a reusable template. Create and edit templates under Directory Admin → Form Builders, then assign a template to a directory from that directory's General settings ("Listing template"). Because templates are reusable, several directories can share one form or each can have its own.
Settings: Directory Admin → Form Builders (build/edit templates); assign per directory under Directories → [edit directory] → General.
Categories, Locations and Tags
Every listing can be organised with three built-in taxonomies. Categories and Locations are hierarchical (parent/child), which makes them ideal for browsable trees such as Food › Cafés or USA › California › Los Angeles; Tags are flat keywords. Visitors browse a directory by category or location, and the same terms drive the search filters and the map. Manage them under Directory listings → Directory categories / Directory locations / Directory tags.
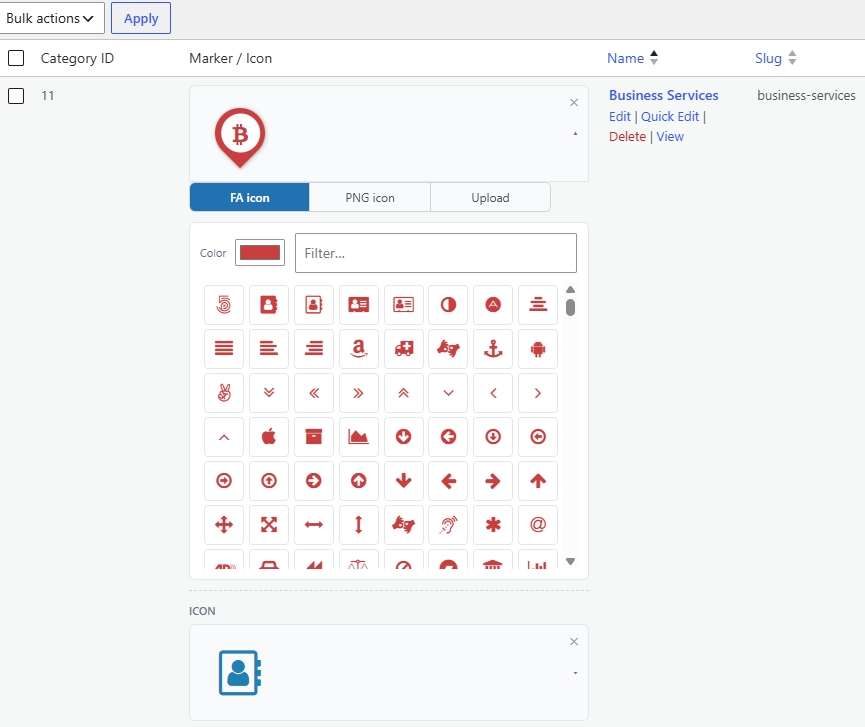
Category and location terms can each carry a small icon shown next to the term name in the browse grids. When editing a term you get an icon picker offering a Font Awesome glyph with a colour, a bundled marker PNG, or your own uploaded image. Categories can also drive per-category map marker icons, so markers on the map visually reflect the listing's category.
Settings: Directory listings → Directory categories / Directory locations / Directory tags; the term icon picker appears on each term's Add/Edit screen.
Maps and Map Engines
Every directory can present its listings on an interactive map with clickable markers, marker clustering for dense datasets, info-window popups, an optional listings sidebar, and controls for zoom, fullscreen, Street View and map/satellite switching. Maps are managed as their own content type under Maps: create a map, configure it, and it is available to the directory page builder. The map edit screen is a visual builder where you set the size, starting point and zoom, choose which fields appear in marker popups and the sidebar, design the on-map search form, and filter which listings' markers appear. Markers are loaded on demand over a REST endpoint and clustered, so directories with thousands of listings stay responsive.
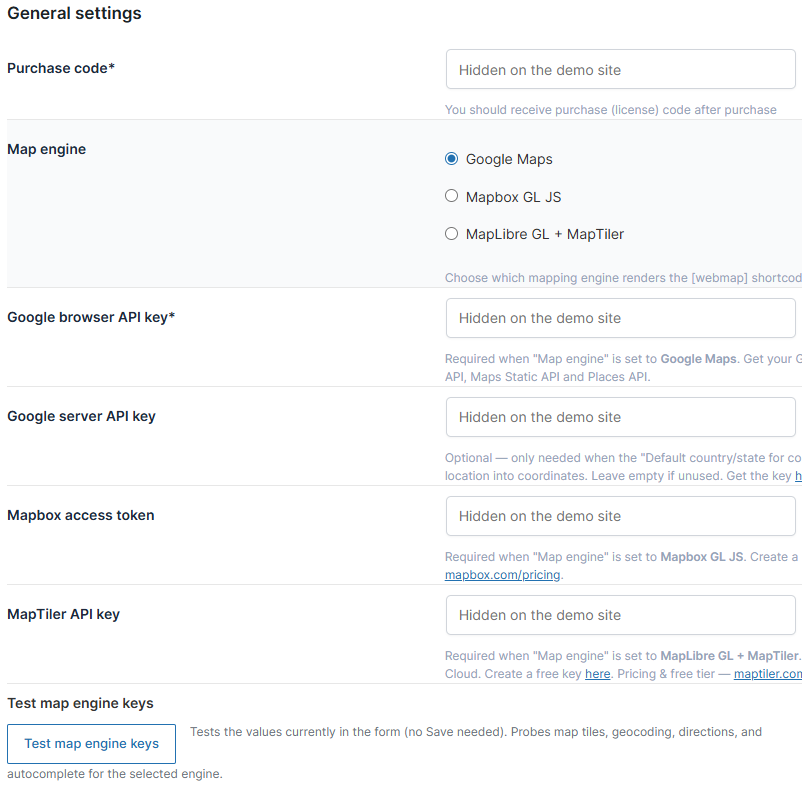
The plugin supports three mapping engines, selectable site-wide: Google Maps, Mapbox GL JS, and MapLibre GL + MapTiler. Choose the engine and paste the matching API key or token under Directory Admin → Settings → General settings; a Test map engine keys button on the same page probes the tiles, geocoding, directions and autocomplete endpoints so you can validate a key before saving. Because all three engines render the same maps, you can switch providers without rebuilding your maps.
For demos and comparisons, the [webdirectory-engine-switcher] shortcode renders small front-end buttons that let a visitor flip the active engine on the fly (this requires a one-line opt-in constant in wp-config.php; without it the buttons render but explain that switching is disabled).
Settings: Maps (build maps); Directory Admin → Settings → General settings (engine choice + API keys + key test).

Front-end Search
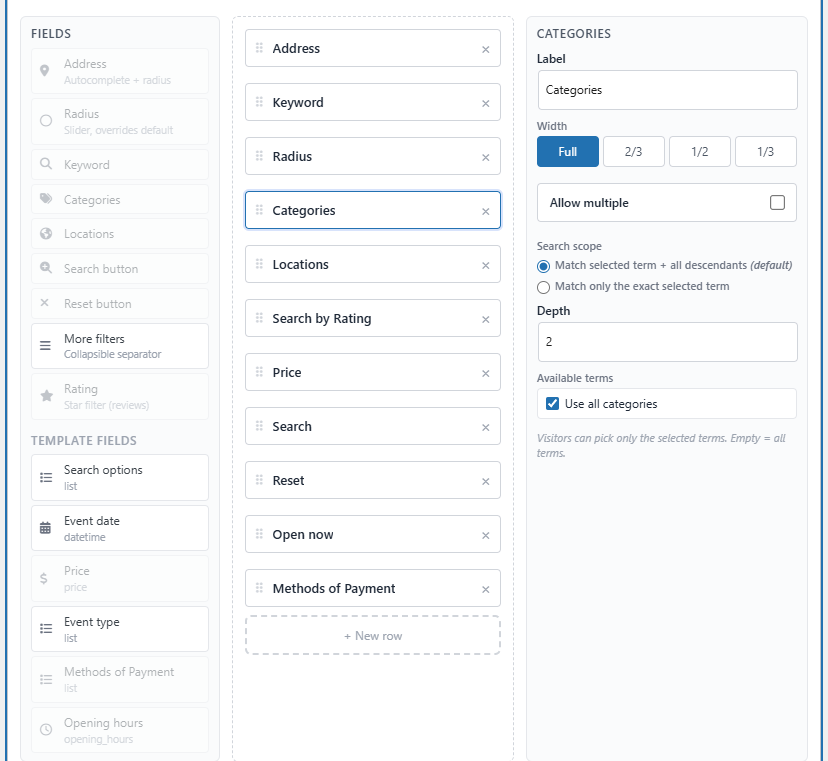
Each map carries a search form that you assemble visually in the map's Search form builder — drag in the fields you want visitors to search by: a keyword box, an address field with radius search (find listings within X miles/kilometres of a point), category and location selectors, and any custom fields from your form template (price, number, date/time, list, opening hours). You choose where the form sits (a map corner), its width, and whether visitors can drag it. The map's marker filters can also pre-scope results before the visitor searches.
Results can be sorted by date, title, random order, any orderable custom field (number, price, date/time) and — when ratings are enabled — by Rating ("Best rating" / "Worst rating"). The default unit for radius search (miles or kilometres) is set globally, and keyword search is powered by a search index that rebuilds automatically as listings are saved (with a manual bulk-rebuild control for large sites).
Settings: the search form is built on the Maps → [edit map] → Search form metabox; global search defaults live under Directory Admin → Settings → Search settings.

Pricing Plans and Paid Submissions (WooCommerce)
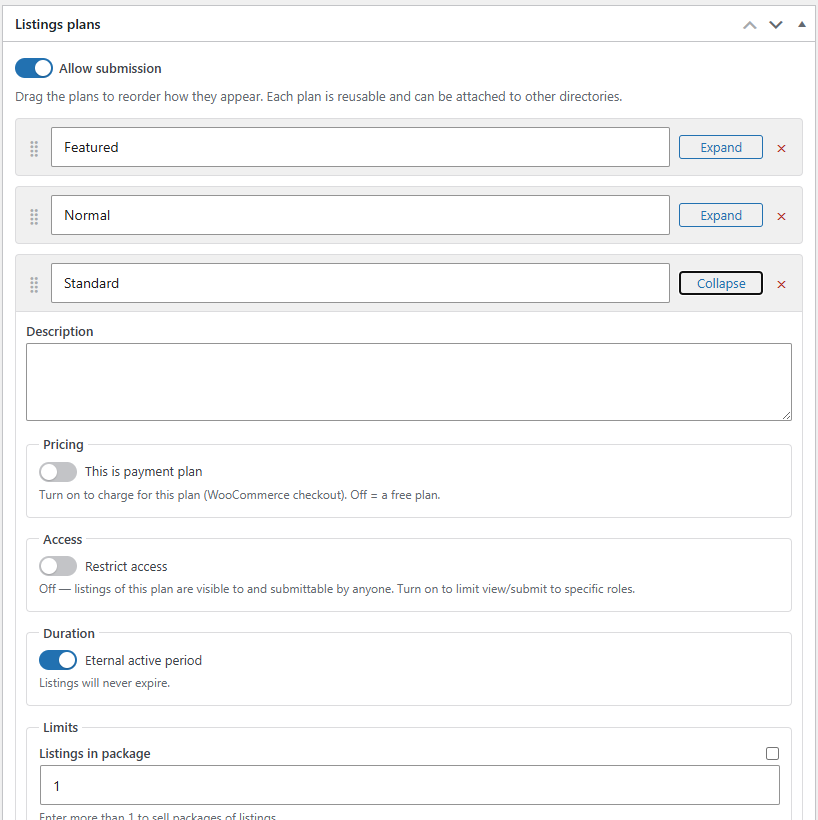
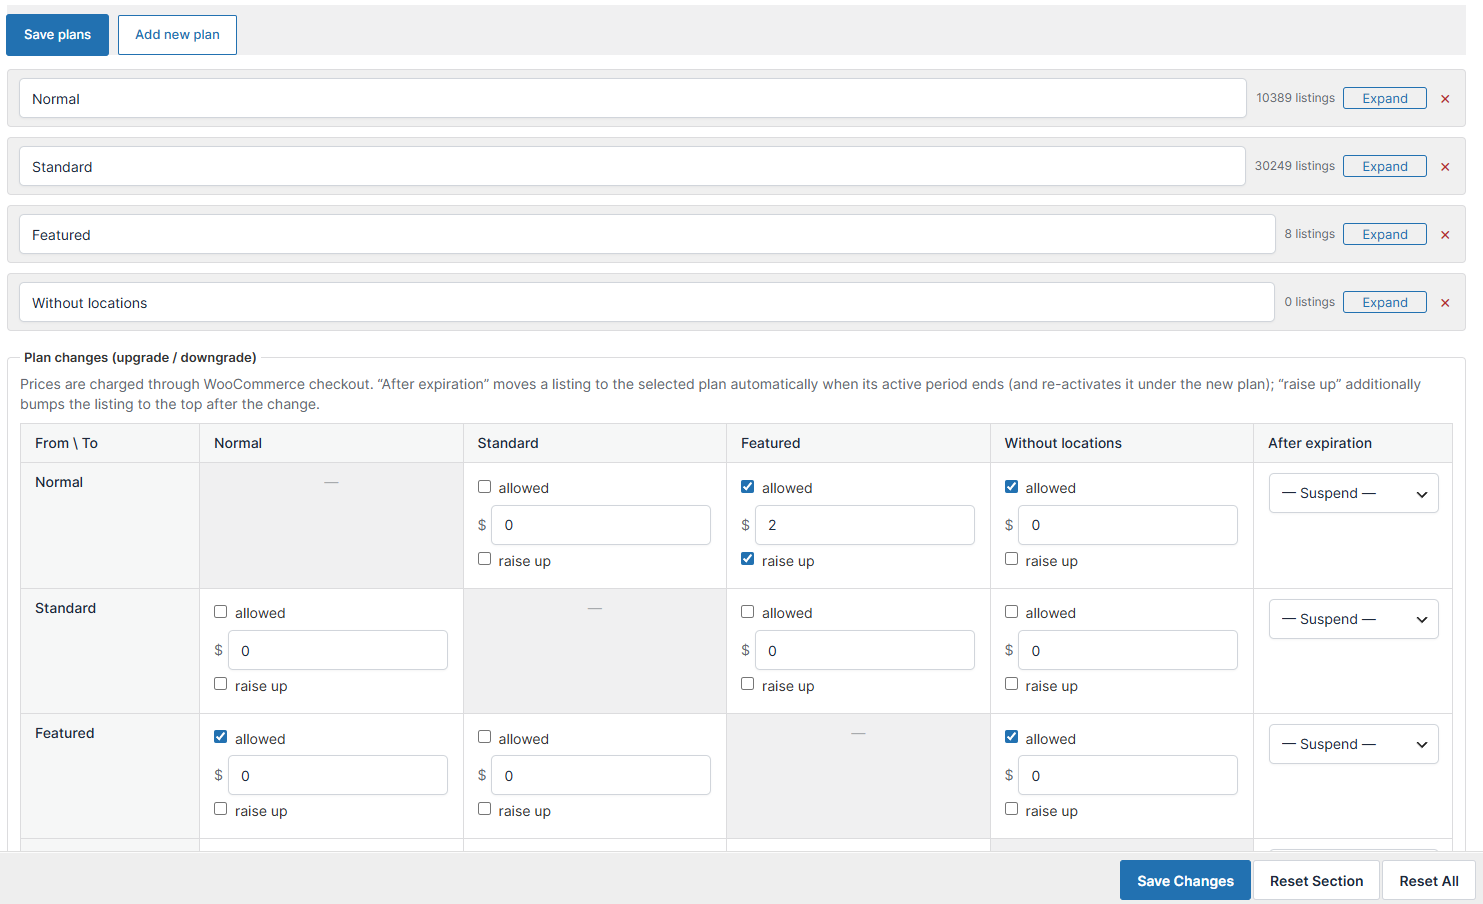
Membership plans define what a submitter gets and what it costs. Each plan controls pricing (submit price, plus optional renew and raise-up prices and a period label such as "/year"), how long a listing stays active (a fixed interval in days/weeks/months/years, or "never expires"), limits (how many listings, categories, tags, locations, images and videos a listing may have), which user roles can submit or view, an optional restricted set of categories/locations, and display flags such as sticky (pinned to the top) and a highlighted "recommended" ribbon on the plan card. Plans are edited per directory in the Listings plans panel on the directory edit screen, and globally under Directory Admin → Settings → Plans, where you can also reassign every listing from one plan to another before deleting a plan.
Paid listings are entirely optional and are powered by WooCommerce — the plugin never handles card details itself. WooCommerce, through whichever payment gateway you set up in it (Stripe, PayPal, and so on), takes the money; Web 2.0 Directory only creates the order and activates the listing once it is paid. To switch paid submissions on:
- Install and activate WooCommerce, and set up at least one payment gateway in it (WooCommerce → Settings → Payments).
- Turn on Enable WooCommerce payments under Directory Admin → Settings → Payments, and choose the checkout currency there (it defaults to WooCommerce's own currency).
- Open a plan, tick This is payment plan and set its Submit price (and, if you want them, the renew and raise-up prices).
- Offer that plan on a directory under Directories → [edit directory] → Listings plans.
When a member submits a listing on a paid plan, the listing is held (not yet published) while the plugin creates a WooCommerce order and sends them to the WooCommerce checkout. As soon as the order is paid, the listing is published automatically and its expiry date is set from the plan's active period. Behind the scenes each plan is linked to one hidden, virtual WooCommerce product (kept out of your shop catalogue and search), so plan orders never clutter your store. A listing whose order is still unpaid stays pending until it is paid — the buyer can finish payment later from their dashboard.
The same WooCommerce flow powers three ongoing actions from the member dashboard:
- Renew – extend an expired or expiring listing (priced per plan).
- Raise up – bump a listing back to the top of its directory (priced per plan; can be turned off per plan).
- Upgrade / change plan – move a listing to a different plan, priced by a plan-change matrix where you set which transitions are allowed and what each costs (and, optionally, which plan a listing drops to when it expires).
Currency, taxes, receipts and invoices are all handled by WooCommerce — Web 2.0 Directory adds only the currency picker (which defaults to WooCommerce's) and applies no tax logic of its own. Members can review everything they have bought on the Orders tab of their dashboard (shown only when WooCommerce is active), which links through to WooCommerce's own order and invoice pages. For how listings expire and how renewal reminders are sent, see Moderation, Expiration and Renewal below.
Settings: Directory Admin → Settings → Payments (enable WooCommerce payments + currency); Directory Admin → Settings → Plans (global plan manager + plan-change matrix); Directories → [edit directory] → Listings plans (offer plans per directory, the "This is payment plan" toggle and prices). Requires the WooCommerce plugin for paid flows.


CSV Import and Export
Manage listings in bulk from Directory Admin → CSV Import/Export. Import maps the columns of your CSV to listing fields, categories, locations, tags, images, the target directory and plan, and (optionally) ratings — creating or updating listings in batches with a progress bar; on-page instructions explain the expected column format. Export produces a CSV of your listings including the directory and plan columns, so you can back up, edit externally and re-import, or migrate content between sites. A Demo tab can import ready-made sample listings so you can see a populated directory immediately.
Settings: Directory Admin → CSV Import/Export (Import / Export / Demo tabs).
Ratings and Reviews
The plugin includes built-in lite ratings: one-click 1–5 star ratings that show an average and vote count on the Rating element, in map popups and in the map sidebar — visitors rate without writing anything. Enable them under Directory Admin → Settings → Ratings, where you can also allow anonymous (logged-out) ratings and protect anonymous votes with invisible reCAPTCHA v3. Ratings feed the search "Rating" sort described above.
For full reviews, install the separate Ratings & Reviews add-on. It adds rich-text reviews with images, per-criteria ratings (rate several aspects of a listing separately), likes, review moderation and a reviewer dashboard, and it integrates directly with your directories. When the add-on is active it takes over all rating surfaces and the built-in lite ratings step aside automatically (your existing lite votes are preserved either way).
Settings: Directory Admin → Settings → Ratings (built-in lite ratings). Full reviews require the Ratings & Reviews add-on plugin, which adds its own settings.
Directory Page Builder (per-page layouts)
Each directory's front end is composed with a drag-and-drop page builder on the directory edit screen. The builder has a tab for each directory view — Home, Categories, Locations, Favourites and the single Listing page (plus a Review page when the Ratings & Reviews add-on is installed) — and you lay out each view independently by dropping elements from a palette into rows and columns. Available elements include the listings grid, the search form, a map, category and location grids, a page title, breadcrumbs, term descriptions, action buttons, a plans/pricing table, a slider, and single-listing content elements (field groups, galleries, contact and report forms, rating and comments). Layouts are saved per page and per directory; a view with no custom layout falls back to a sensible built-in default. Responsive breakpoints let grid columns collapse gracefully on tablet and mobile.
Settings: Directories → [edit directory] — the page builder occupies the right pane of the edit screen, with a tab per directory view.
Front-end Submission and Member Dashboard
Visitors and members submit listings through a page containing the [webdirectory-submit] shortcode. The submission is a guided wizard: choose a plan (skipped when the directory offers only one), fill in the listing form (built from your Form Builder template), and — for paid plans — complete WooCommerce payment. You can allow anonymous submission: a logged-out visitor enters an email, the plugin creates an account for them, holds the listing inactive and emails an activation link. User self-registration can be enabled or disabled independently.
A page containing [webdirectory-dashboard] gives members a self-service area: a My listings tab (edit, renew, raise up, upgrade, pause/resume and delete their listings, each with a logo thumbnail), a Profile tab, and — with WooCommerce — an Orders tab showing their purchases. Listings can also be claimed: if a plan allows it, a user can request ownership of an existing listing, which an admin approves to transfer it to them.
Settings: submission gates (allow registration, allow anonymous submit) under Directory Admin → Settings → Listings; place [webdirectory-submit] and [webdirectory-dashboard] on WordPress pages.
Moderation, Expiration and Renewal
You control the listing lifecycle from Directory Admin → Settings → Listings. Turn on moderation to hold new listings (and front-end edits) in Pending review until an admin approves them. Expiration can be global ("never expire" or a fixed active period in days/months/years) or, more powerfully, driven per plan — each plan sets its own active interval. An hourly background task moves expired listings out of view automatically; a Test listings expiration button lets admins run and inspect that check on demand. You can let members change expiration dates and renew their own listings, and configure pre-expiration and expiration reminder emails.
Email delivery for activation, moderation and expiration notices is configured under Directory Admin → Settings → Email notifications, which includes a Test email delivery button. Public-facing forms (contact and submission) can be protected with Google reCAPTCHA (v2 checkbox or v3 invisible), configured under Directory Admin → Settings → Advanced settings with a built-in diagnostics button.
Settings: Directory Admin → Settings → Listings (moderation, expiration, renewal); → Email notifications (emails + test); → Advanced settings (reCAPTCHA). Per-plan durations live on each plan under Directories → [edit directory] → Listings plans.
Appearance and Onboarding
The front-end styling follows a colour palette you pick under Directory Admin → Settings → Customization (choose a preset or set primary/secondary, link and button colours), where you can also enable an image lightbox for listing photos in popups and the sidebar. Address display order and formatting are configured under Directory Admin → Settings → Address settings, which also toggles address autocomplete and a "Get my location" button. On first activation a short setup wizard helps you pick a map engine, build a starter listing form and optionally load demo data.
Settings: Directory Admin → Settings → Customization (colours, lightbox); → Address settings (address format & input).
Customization
Web 2.0 Directory renders its front-end pages (maps, category grids, single listings, the submission wizard, the member dashboard) with its own set of styles and templates. You can restyle those pages without writing code from the plugin's Customization settings, and you can go further by overriding individual template files from your theme.
Where the appearance settings live
- In the WordPress admin, open Directory Admin → Settings.
- On the settings page (titled Web 2.0 Directory Settings), select the Customization tab (the brush icon).
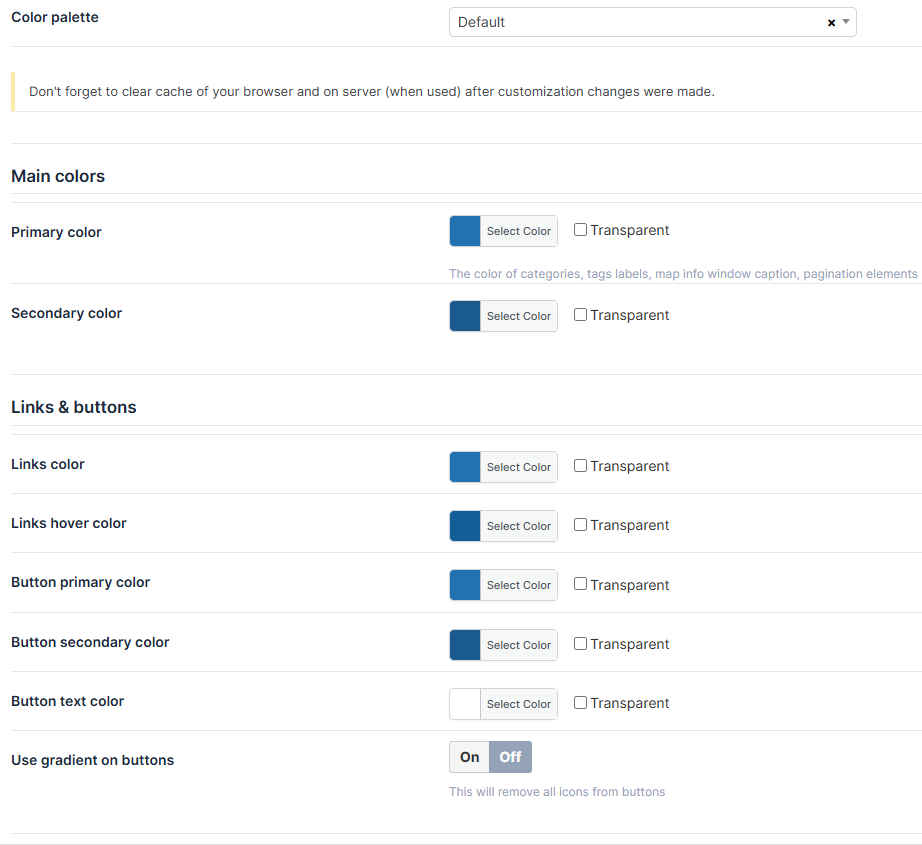
Every option on this tab is saved instantly to the plugin's color variables and applied across both the front end and the plugin's admin screens. After changing colors, remember to clear any page/browser cache so the new palette is served — the tab shows this reminder itself.
Color palette
The Color palette dropdown is a one-click starting point. Choosing a preset fills in all of the individual color pickers below it with a matched set of values, which you can then fine-tune. Available presets:
| Preset | Notes |
|---|---|
| Default | The standard blue scheme the plugin ships with |
| Turquoise | Teal accent |
| Orange | Orange accent on neutral grays |
| Red | Red accent |
| Yellow | Yellow/gold accent |
| Green | Green accent |
| Gray | Muted neutral scheme |
Tip: Pick the preset closest to your brand first, then adjust the individual colors below. Selecting Default at any time restores the standard values.
Individual colors
Below the palette dropdown the options are grouped into three sections.
Main colors
| Option | What it controls |
|---|---|
| Primary color | Category and tag labels, the map info-window caption, and pagination elements |
| Secondary color | The complementary accent used alongside the primary color |
Links & buttons
| Option | What it controls |
|---|---|
| Links color | Normal state of links inside the plugin's pages |
| Links hover color | Link color on hover |
| Button primary color | Main call-to-action button background (for example, the Submit, Save, and browse buttons) |
| Button secondary color | The button's hover background (and the second color used when the button gradient is enabled) |
| Button text color | Text/label color inside buttons |
| Use gradient on buttons | When turned on, buttons are drawn with a gradient blending the primary and secondary button colors. Note: enabling this also removes the icons from buttons. Off by default. |
Images
| Option | What it controls |
|---|---|
| Enable image lightbox | When on, clicking a listing image — in a map popup or the sidebar — opens it full-size in a lightbox overlay. When off, images stay as static thumbnails. Off by default. |
Each color option is a standard WordPress color picker: click the swatch, choose a color (or paste a hex value), and save the settings page.


Is there a custom-CSS box?
There is no free-text "Custom CSS" field in the plugin's settings — visual changes are driven by the color options above. If you need CSS beyond the palette, add your rules through your theme's own Appearance → Customize → Additional CSS (or a child theme stylesheet) and target the plugin's front-end classes, which are all prefixed with w2dc- (for example .w2dc-dir-btn for directory buttons). The color options themselves are exposed to the page as CSS custom properties named --w2dc-* (such as --w2dc-primary, --w2dc-button-primary), so your custom rules can reuse the admin-chosen palette, e.g. color: var(--w2dc-primary);.
Template overrides
Every front-end fragment the plugin renders lives in a small .tpl.php template file. Your theme can replace any of these with its own copy — the plugin looks in the active theme first and only falls back to its bundled file if no override is found. This lets you change the markup of a listing, a category cell, a pricing card, and so on, without editing the plugin.
The override folder
Create this folder inside your active theme (a child theme is strongly recommended so your overrides survive theme updates):
wp-content/themes/<your-theme>/w2dc-plugin/templates/Inside it, mirror the same sub-folder and filename as the plugin's own template. The front-end element templates live in a front/ sub-folder, so their override path is:
wp-content/themes/<your-theme>/w2dc-plugin/templates/front/<template-file>.tpl.phpThe plugin resolves each template in this priority order (first match wins):
…/w2dc-plugin/templates/<path>-custom.tpl.phpin your theme…/w2dc-plugin/templates/<path>.tpl.phpin your theme- The plugin's bundled
templates/<path>.tpl.php
Because the -custom.tpl.php variant is checked first, you can keep an override in a …-custom.tpl.php file if you want it to take precedence even over a same-named file elsewhere. For most cases, simply copying the file under its original name into your theme is enough.
Key overridable front templates
These are the front-end element templates you are most likely to want to customize (all under w2dc-plugin/templates/front/):
| Template file | Front-end element it renders |
|---|---|
element-buttons.tpl.php | Action buttons (submit / browse / edit / bookmark) — [webdirectory-buttons] |
element-breadcrumbs.tpl.php | Breadcrumb trail — [webdirectory-breadcrumbs] |
element-page-title.tpl.php | Sub-page heading — [webdirectory-page-title] |
element-term-grid.tpl.php | Category / location grid — [webdirectory-categories] / [webdirectory-locations] |
element-term-item.tpl.php | A single term cell (icon + name + count) inside the grid |
element-term-description.tpl.php | The current term's description — [webdirectory-term-description] |
element-listing-fields.tpl.php | Single-listing body: content plus all fields — [webdirectory-listing-fields] |
element-listing-field.tpl.php | One content-field row (label + value) |
element-listing-field-group.tpl.php | One titled group of fields |
element-listing-gallery.tpl.php | The listing image gallery grid — [webdirectory-listing-gallery] |
element-slider.tpl.php | Recent-listings scroll strip — [webdirectory-slider] |
element-plans.tpl.php | Pricing-table wrapper — [webdirectory-plans] |
element-plans-card.tpl.php | A single pricing card in the plans table |
submit-step1.tpl.php | Submission wizard — step 1 (plan chooser) |
submit-step-indicator.tpl.php | Submission wizard — step indicator (Plan → Listing details → Payment) |
submit-plan-card.tpl.php | A single plan card on the wizard's plan-chooser step |
submit-selected-plan.tpl.php | The "Selected plan" bar (with a Change link) on the wizard |
submit-disabled.tpl.php | "Submission disabled for this directory" notice |
(The member dashboard's templates live under w2dc-plugin/templates/dashboard/ and follow the same override rules.)
Example: override the buttons template
Suppose you want to wrap the directory action buttons in an extra container of your own.
- Locate the bundled template inside the plugin folder:
wp-content/plugins/w2dc/templates/front/element-buttons.tpl.php
- Copy it into your (child) theme, keeping the folder structure:
wp-content/themes/<your-theme>/w2dc-plugin/templates/front/element-buttons.tpl.php
- Edit your copy. For example, add a wrapper
<div>:
``php <?php if ( ! defined( 'ABSPATH' ) ) exit; ?> <div class="my-theme-listing-actions"> <div class="w2dc-dir-el w2dc-dir-el--buttons"> <?php foreach ( $links as $w2dc_link ) : ?> <?php $w2dc_cls = 'w2dc-dir-btn' . ( ! empty( $w2dc_link[2] ) ? ' w2dc-dir-nav' : '' ); ?> <a class="<?php echo esc_attr( $w2dc_cls ); ?>" href="<?php echo esc_url( $w2dc_link[1] ); ?>"><?php echo esc_html( $w2dc_link[0] ); ?></a> <?php endforeach; ?> <?php echo $bookmark_html; ?> </div> </div> ``
- Save. The directory now renders your version of the buttons element; no plugin files were touched, so updating the plugin will not overwrite your change.
The variables each template receives (such as $links and $bookmark_html above) are documented in a comment block at the top of every bundled .tpl.php file — read that header before editing so you know what data is available.
Custom markers and marker icons
Map markers are fully customizable, and the icon is chosen where the thing it represents is edited rather than on the Customization tab.
Per-category marker icons
The most common way to brand your map is to give each directory category its own marker. Open a directory category for editing (the category / term edit screen) and use the Marker picker. It offers three modes:
- Icon — choose a Font Awesome glyph and set its color. The icon is drawn inside the map pin.
- Image — pick one of the marker images bundled with the plugin.
- Upload — upload your own marker image (PNG or WebP); it is stored in the Media Library and used as the pin.
Listings inherit their marker from their category (walking up to parent categories when a sub-category has none).

Per-listing and per-map markers
- A single listing can carry its own custom marker that overrides its category marker; this is set when editing that listing's location.
- Each map has a default marker and an ordered list of marker sources (for example: use the category marker, fall back to the listing's own marker, then to a listing image). These are configured on the map's edit screen, where the first source that produces an icon for a given listing wins.
Replacing the bundled marker image set (advanced)
The plugin ships a folder of ready-made marker PNGs that appear under the picker's Image mode. A theme can supply its own set by placing image files in:
wp-content/themes/<your-theme>/w2dc-plugin/resources/images/map_icons/When that folder exists, the plugin serves marker images from your theme instead of its own bundled set.
Translation & Localization
Web 2.0 Directory is fully internationalized and ready to translate into any language WordPress supports. Every user-facing label — admin menus, settings, the listing submission form, the interactive map and its controls, the drag-and-drop form builder, the CSV importer, and front-end messages — is wrapped for translation. This section explains where the translation files live, how to name them, and how to create a translation using either Loco Translate (in your dashboard) or Poedit (on your desktop).
The text domain
All translatable strings in the plugin share a single text domain: w2dc. You will use this text domain in every translation file name (see File naming below).
The plugin loads its translations automatically on every request — no configuration is required. As soon as a matching translation file is present in one of the supported locations, WordPress serves the translated strings.
The translation template (.pot)
The plugin ships with a ready-made translation template you can use as the starting point for any language:
wp-content/plugins/w2dc/core/languages/w2dc.potThe .pot (Portable Object Template) file contains every original English string in the plugin (over 800 phrases) with empty translation slots. You never edit the .pot itself — you use it to generate a language-specific .po/.mo pair. The plugin header declares this folder as its Domain Path (/core/languages), so translation tools such as Loco Translate detect the template here automatically.
Where your translation files belong
You produce two files per language:
| File | Purpose |
|---|---|
w2dc-{locale}.po | Human-readable catalog you edit in a translation tool |
w2dc-{locale}.mo | Compiled binary WordPress actually reads at runtime |
There are two possible locations. The global folder is strongly recommended:
- Global languages folder (recommended, update-safe):
`` wp-content/languages/plugins/w2dc-{locale}.po wp-content/languages/plugins/w2dc-{locale}.mo `` WordPress checks this location first, and your files here are never touched when the plugin updates. This is where Loco Translate's "System" location and translate.wordpress.org both save.
- The plugin's own folder (not recommended):
`` wp-content/plugins/w2dc/core/languages/w2dc-{locale}.mo `` Files placed inside the plugin will be overwritten (and your work lost) every time the plugin is updated. Only use this for quick throwaway testing.
Tip: Always keep your finished translations in wp-content/languages/plugins/ so a plugin upgrade never erases them.
File naming (required)
The file name must be exactly w2dc-{locale}.po / w2dc-{locale}.mo, where {locale} is the WordPress locale code for your language. If the name or locale is wrong, WordPress will silently ignore the file. Examples:
| Language | Locale | .mo file name |
|---|---|---|
| French (France) | fr_FR | w2dc-fr_FR.mo |
| German | de_DE | w2dc-de_DE.mo |
| Spanish (Spain) | es_ES | w2dc-es_ES.mo |
| Portuguese (Brazil) | pt_BR | w2dc-pt_BR.mo |
| Italian | it_IT | w2dc-it_IT.mo |
You can confirm your site's locale under Settings → General → Site Language. WordPress also supports a per-user admin language set in each user's profile — a translation file must exist for that locale for it to take effect.
Map, form builder, and other interface strings
The interactive map, the listing submission form, the drag-and-drop form builder, the directory-edit screen, and the CSV importer are built with React, but their text is translated through the same PHP text domain — the strings are translated on the server and handed to the interface. This means:
- Every interface string is covered by the single
w2dc.pottemplate and thew2dc-{locale}.po/.mofiles described above. - There are no separate JSON language files to generate — one
.po/.mopair per language translates the entire plugin, both classic PHP screens and the React-based interfaces.
Method 1 — Loco Translate (recommended, translate in your dashboard)
Loco Translate lets you translate directly inside WordPress with no desktop software, and saves to the update-safe global folder.
- In your dashboard, go to Plugins → Add New, search for Loco Translate, then Install and Activate it.
- Go to Loco Translate → Plugins and click Web 2.0 Directory (W2DC) in the list. Loco automatically finds the bundled
w2dc.pottemplate. - Click New language.
- Choose your language from the WordPress language dropdown.
- For Choose a location, select System (this saves to
wp-content/languages/plugins/, which survives plugin updates). Click Start translating. - In the editor, click any string in the Source text list, type its translation in the {Language} translation box at the bottom, and move to the next string. Loco marks untranslated strings so you can track progress.
- Click Save. Loco compiles the
.mofile automatically — no extra step is needed. - Reload a front-end or admin page to see the translated text.
Keeping a translation current: after a plugin update introduces new strings, reopen your language in Loco Translate and click Sync to pull the new phrases from the template, then translate and Save again.


Method 2 — Poedit (desktop application, start from the .pot)
Poedit is a free desktop editor ideal for translating offline or handing the file to a professional translator.
- Download and install Poedit from poedit.net.
- Get a copy of the template from your server:
wp-content/plugins/w2dc/core/languages/w2dc.pot. - Open Poedit and choose Create new translation (or File → New from POT/PO file), then select the
w2dc.potfile. - When prompted, choose the target language (e.g. German). Poedit fills in the translation metadata for you.
- Translate each entry: click a source string, type the translation in the lower panel, and continue through the list.
- Choose File → Save. Name the file exactly
w2dc-{locale}.po(for examplew2dc-de_DE.po). Poedit automatically writes the matching compiledw2dc-{locale}.moalongside it. (If you don't see the.mo, enable "Automatically compile MO file when saving" in Poedit's preferences.) - Upload both files (
.poand.mo) via SFTP or your host's File Manager to:
`` wp-content/languages/plugins/ ``
- Make sure Settings → General → Site Language matches the locale you translated, then reload the site.
Keeping a translation current: when a plugin update adds new strings, reopen your .po in Poedit and choose Translation → Update from POT file, select the updated w2dc.pot, translate the new entries, and save again.

Quick checklist
- Text domain is
w2dc— used in every file name. - Start from
wp-content/plugins/w2dc/core/languages/w2dc.pot. - Name your files
w2dc-{locale}.poandw2dc-{locale}.mowith a valid WordPress locale. - Save them in
wp-content/languages/plugins/so updates don't erase them. - One
.po/.mopair translates the entire plugin, including the map and form-builder interfaces. - Set the matching language under Settings → General → Site Language.